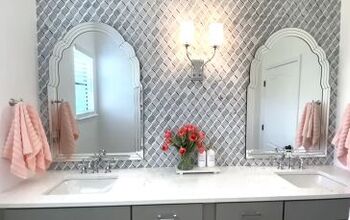
Planning a Bathroom Remodel? Discover These Designer Tips & Ideas

Today we are diving deep into the details of remodeling a shower or bathtub surround. So if you are considering a full-on bathroom remodel or you are curious to know what such a project involves, this is for you. By the end, you will have some bathroom remodeling ideas you can rely on.
Table of contents

1. Create a mood board
First, let's go over some tips on preparing for a bathroom remodel project. Before you even consider a remodel, put together a mood board for how you want your space to look.

Collect images from magazines and Pinterest that appeal to you.

Drawing inspiration from photos will help you visualize color schemes, texture, and finishing touches. It will also give you a reference point for the way you want your space to look like.

You can create your mood board electronically by saving the images on your iPad or phone.

Or, you can print them and put them in a binder or paste them onto pieces of paper.

Armed with an inspirational mood board, you will be able to make decisions on tiles, colors, fixtures, and metal finishes that fit the overall look you want to achieve, without getting overwhelmed.

2. Select the tile
The type of tile, its color and shape, and how it will be laid out, are some of the most important decisions you will need to make because this material will cover the largest surface area and set the tone of the overall style and vibe of your bathroom.

3. Choose the shower entrance
You will also need to decide if you want a curbless shower entrance that offers a seamless flow from the floor into the shower or whether you prefer a bump or lip at the entrance of the shower.

This decision will affect the options you have to contain water within the shower enclosure and keep it from splashing out into the rest of the space.

4. Create a niche
Nowadays, most new or remodeled showers will include a niche which, in simple terms, is a tiled inset into the shower wall for placing your body wash, shampoo, conditioner, etc.

Determining the size and placement of the niche depends on how many products you tend to use for bathing and the most convenient location within the shower for easy access.

5. Consider a bench or ledge
If space allows, consider having a tiled bench or ledge built into the shower.

This is especially convenient for sitting or placing your foot on it to make lathering up easier.

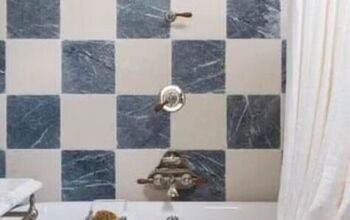
6. Pick your fixtures
There are many options, from rain showers to massage sprays and even dual-fixtures that include an overhead shower head or a handheld wand.

Also, think of what control features you'd like. Ask yourself, do you want a standard on-off, or would you like the ability to preset water temperature?

What you pick will depend on your needs, wants, and of course, your budget.

7. Decide on grout
Choosing grout line width and color is important because it can change the overall look of your tile installation.

Consider whether you want the grout to blend in with your tile color or act as a contrast. It all depends on the look you're going for.

Whatever you choose, I suggest using grout that includes a sealant to make cleaning easier.

8. Handpick tile edge trim
If the tile you are using doesn’t have a smooth edge to finish it off, an excellent way to remedy that is to use a Schluter trim.

There are many options to choose from and the best idea is to match it to your tile or grout.

Bathroom remodeling process
Now let's move on to this specific project as an example of the step-by-step process.

This master bathroom was in a three-year-old tract home and although by normal standards it would be considered well-equipped, it lacked character and style.

So when an issue with the shower caused a series of events that led to demolishing the shower and rebuilding it from scratch, it was decided to level up the overall style of the room.

Before jumping into the project, the main areas of the house had to be prepped for what would be a seven-day process of demolishing and reconstructing the shower.

On the second and third day, crowbars, chisels, and jackhammers were put into action. Shower tiles and backer boards were carefully cut and pried away to the studs. The plan was to replace the builder-grade prefabricated shower pan with small-scale tile.

So once that was removed, the cement shower floor had to be jackhammered and chiseled away to create an appropriate slope to the newly fitted drain pipe.

The surface was then smoothed out with cement compound.

Once all the debris was cleared and removed from the premises, it was time to start putting the shower back together again.

New cement boards and waterproofing were installed, followed by the detailed work of laying the tiles.

Once the wall tiles were up, a matching two-inch mosaic tile was installed on the shower floors.

The grout color matches the existing floor tile grout, but this time a grout that has a sealant within it was used, to prevent the grout lines from staining over time.

The bathroom fixtures were in very good condition, so they were reinstalled.

The final feature of this part of the project was installing a frameless glass shower door. The original shower had builder-grade shower doors, so this was an opportunity to upgrade to a higher standard.
Bathroom remodel ideas
I hope you found these step-by-step instructions for a shower remodel interesting and also got some tips on how to handle a bathroom remodel project of your own. Anyone can jump into bathroom remodeling with the right research and know-how, whether you’ve ever experienced it yourself or not.
What is one must-have you would like to see if you completed your own DIY bathroom project this year? Let me know. I love to gather new ideas.
Disclaimer: I may receive a small affiliate commission from purchases made via Amazon links in this article but at no cost to you.
Product links
- Shower System with Jets & Rain Overhead Shower & Handheld: https://amzn.to/4b8fVFe
- Shower Flow Control Valve Temperature: https://amzn.to/3Oh3InP
- Shower System : https://amzn.to/48MN1cc
- High Pressure Rain Shower System: https://amzn.to/3Ud1MR8


Comments
Join the conversation