Minimalist Kitchen Ideas: Small Changes For a Huge Transformation

We are standing in my kitchen, and I want to show you a little sneak peek of what I'm going to be doing in my minimalist kitchen makeover. From my must-have minimalist kitchen essentials to minimalist kitchen decor, I have put a lot of thought into this project before getting started. Let’s check it out!

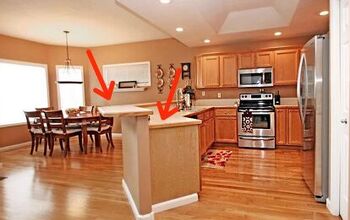
All of these upper cabinets are coming down.

I do have a lot of storage space down below, but this home was built in the 1990s, and it still has that 90s touch. It's not fresh and modern compared to everything else that's in my home, so while it is a lovely kitchen and there's absolutely nothing wrong with it, I kind of wanted it to blend in with the rest of the home.
This is an opportunity to do a very small refresh because the cabinets are great and so is the color. I almost painted them black, but I decided to go this route instead. I feel like it satisfies the minimalist in me, and I'm going to appreciate it so much more.

What led me to do this whole renovation right now is that I removed a big cabinet and put up these three shelves. Unfortunately, I am not really feeling that look, so instead, I am going to have one cohesive shelf running through the rest of the kitchen.


Then, we're going to change the subway tile backsplash to this marble that we purchased. Hopefully, I don't break it first.
If I spin around my kitchen, you can see that we have a double oven. All the appliances here are white, which is not ideal for me. They are a tiny bit outdated, so I'm going to put in stainless steel appliances.

We also have beautiful granite that will blend in nicely with the marble tile we have selected.

Here you'll see my very old refrigerator that is going to get replaced with a new custom counter depth refrigerator.

On the other side of the room, you will see my breakfast table. There is also a buffet table behind it that is a built-in from when the original kitchen was put in.

Here is one last look before we take all these cabinets down. I am not going to lie. I’m a little nervous, but I'm up for a challenge.

I've got the stepstool ready and a drill nearby. Alright. Here we go!

Dave is taking down this cabinetry so that we can get to the tiles. It is a lot of work to do. What we thought would be a simple re-tile, paint, and call it a day, turned into we have to buy cement board, drill it in, patch it up, and then tile after that.

Here is what it looks like without the cabinets on the left-hand side.

And here is what it looks like without the cabinets on the right-hand side. We still have to order our paint and replace the refrigerator. I'm still kind of torn about whether I should update to a new white one and keep the color theme we have going or do stainless steel. We're also thinking of building out a panel so when the new refrigerator comes in, no matter which one I decide on, it is flush and looks seamless.

Here my husband is notching the brackets for the floating shelves. This is something that he thought would work well, and I couldn't agree more.

Now, he's dry-fitting one of the tiles to test it out.

Next, he is making marks so that he can cut the cement board. He says that you can sit here and do a ton of measurements, but sometimes, it's easier to kind of lay it down and go.
Okay, he needs to mark it here next and then set it straight up and down to figure out what the height of them is. He also recommends using a t-square and going straight across, making your lines the way you need them.
Then, he’ll take a sheetrock knife or a normal shop knife and cut squares out for outlets and light switches. He’ll do this by cutting out a U-shape, fitting it in nicely, and screwing it down.

Once all of the metal brackets were attached and the cement board was up, my husband gave the wall a very light sanding.

Here my husband is using a grease pencil to make his marks for every outlet.

And here he is putting up the marble tile.

One of the other ways that we refreshed our kitchen was by updating the handles and knobs on our cabinets. Now, the ones that we had weren't bad, but I wanted a fresh look, so I purchased some beautiful ones from Amazon.

These are natural brass, and they are beautiful. They look very fresh and elegant, and they pair well with the cabinets.

Okay, quick update. Look at this beautiful work that my husband has so far done. I'm going to take you down here.

He still has all of this to go. Don't mind our lunch, but this is it and it's looking really good. I'm so excited!

Here is the final reveal.

I absolutely love how bright and airy it is, and it's minimal. It's so me, and it really did not take too much time. I think we did this entire project within four or five days.

Unfortunately, our favorite refrigerator was on backorder, so we will have to wait a bit. But hopefully, it will be here very soon.
Minimalist kitchen design
If you love a good minimalist kitchen like I do, then you know that having a very intentional minimalist kitchen design is crucial to creating a space that flows and functions. Before you get started, think deeply about your wants and needs in this space.
Which minimalist kitchen ideas are your go-tos? Share your likes and dislikes down below.


Comments
Join the conversation