MASTER BATHROOM REVEAL: NEW BATHROOM MAKEOVER BEFORE AND AFTER
2 Materials
$15000
Advanced
If you’re looking for master bathroom makeover ideas, this remodel with before and after pics will inspire you to upgrade to a new bathroom.
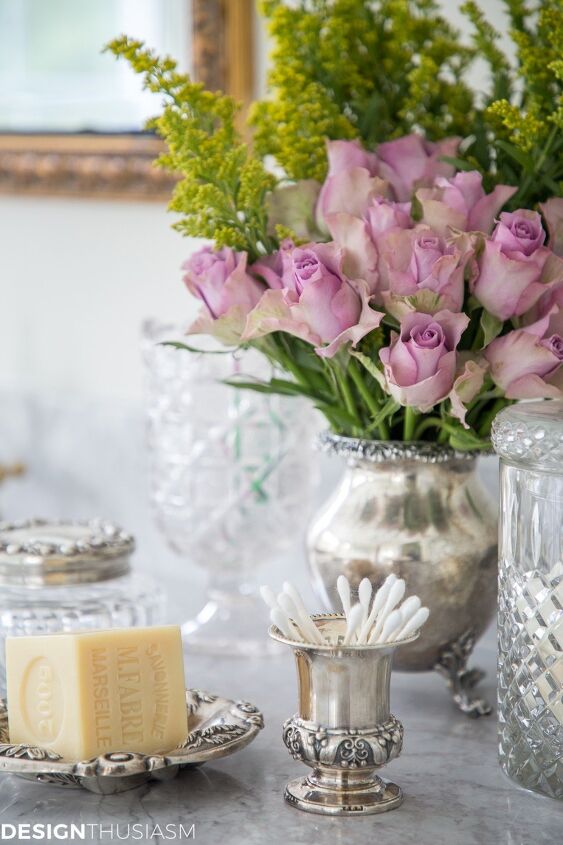
Finally, my vintage bits that I collected for our old master bath have a new home!
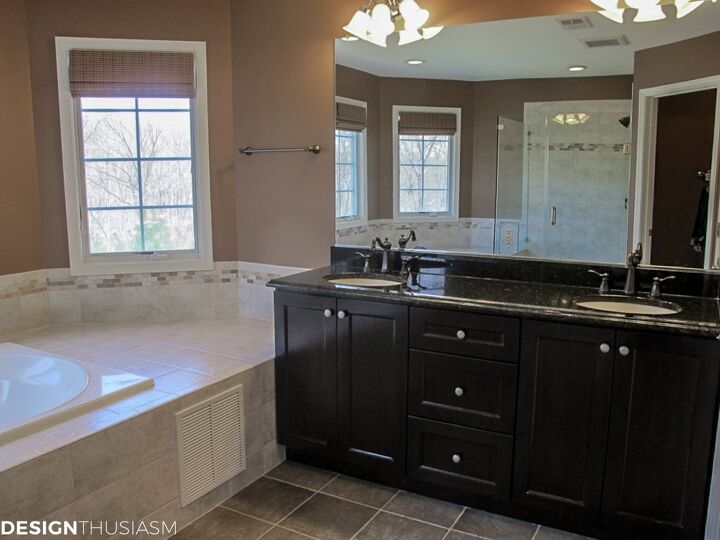
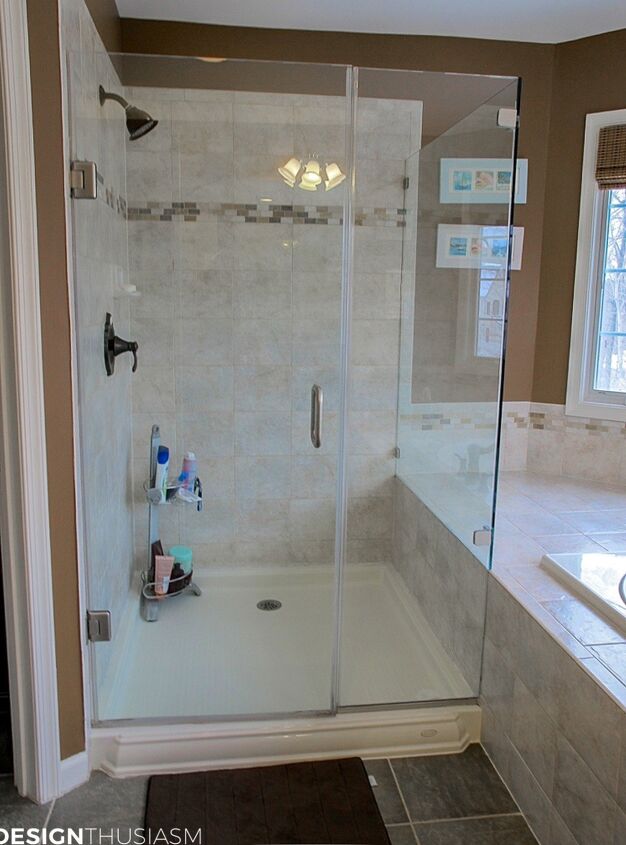
From the time we moved into our townhouse a few years ago, I’ve wanted to renovate the master bathroom. In our former home, we had built on an extension with a brand new bath and I had enjoyed decorating it to my taste. But when we moved into this house, the ensuite bath was so ‘builder’s-grade-boring’, in fact even dark and dreary, that it seemed pointless to try to style it. Sure, the layout was fine and even quite spacious. But the colors, materials and fixtures had to go. You can see what it looked like when we moved in, below.
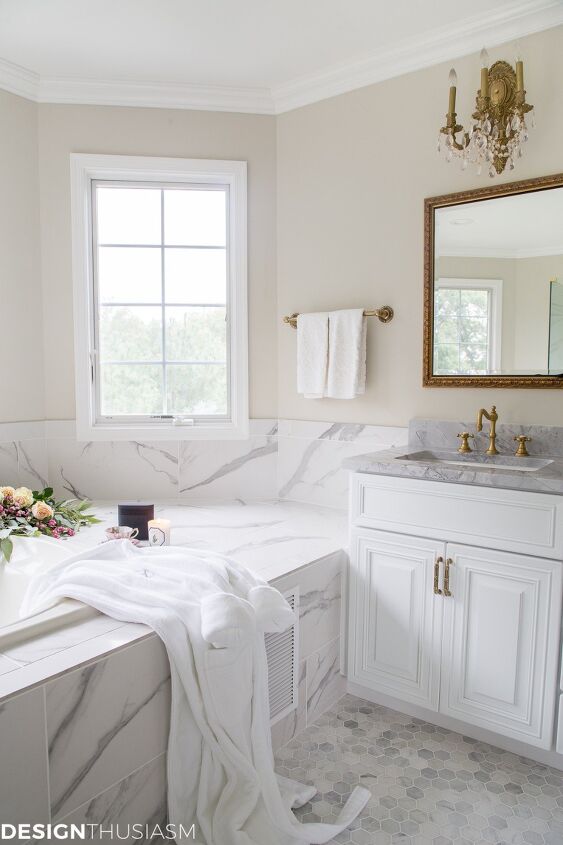
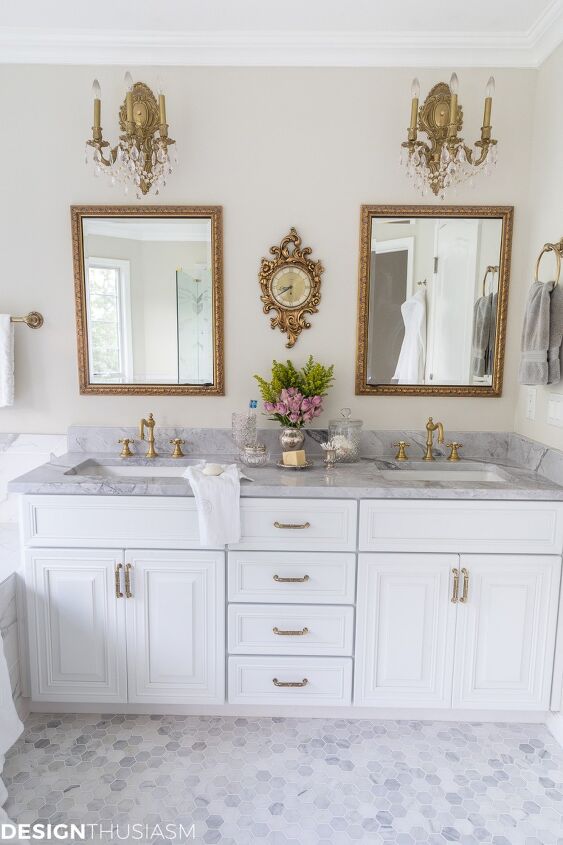
After three years of patiently waiting, I now have the elegant white bathroom I’ve been dreaming of. As with our kitchen renovation which you can see HERE, I wanted to keep costs down by changing as little as possible and yet still wind up with a complete transformation. You’ll see below exactly how we did that.
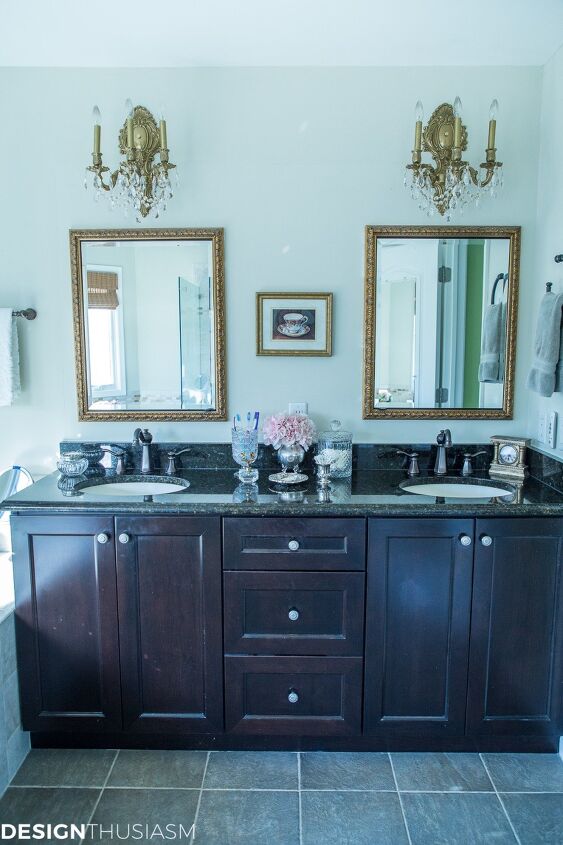
Before we even moved in, the first thing I did was remove the large unframed mirror and typical builder-grade lighting and replaced them with gilt framed medicine cabinets and crystal and brass sconces. We also painted the walls my favorite tapestry beige color, since I knew this room would eventually be white. And then it sat like that for three years!
I did my best to add the pretty in, but my vintage pieces just never worked with the dark materials that dominated the space.
I considered just updating the existing vanity and with paint, a new counter and pretty hardware, that could’ve worked. That’s exactly what we did in our kitchen and it’s a huge money saver.
In this case, however, the reason why I chose to replace the vanity is because it was simply too tall for me. It was driving me crazy that I could barely bend over the sinks and every time I washed my face the water would splash everywhere. This was the one thing hubby disagreed with, but there are 4 other tall sinks upstairs that he can use if he doesn’t feeling like bending down, so that’s a battle I easily won.
Once it was decided that we would replace the vanity, it gave me the freedom to select the door styles that I wanted and add a fourth drawer to the center section of the piece.
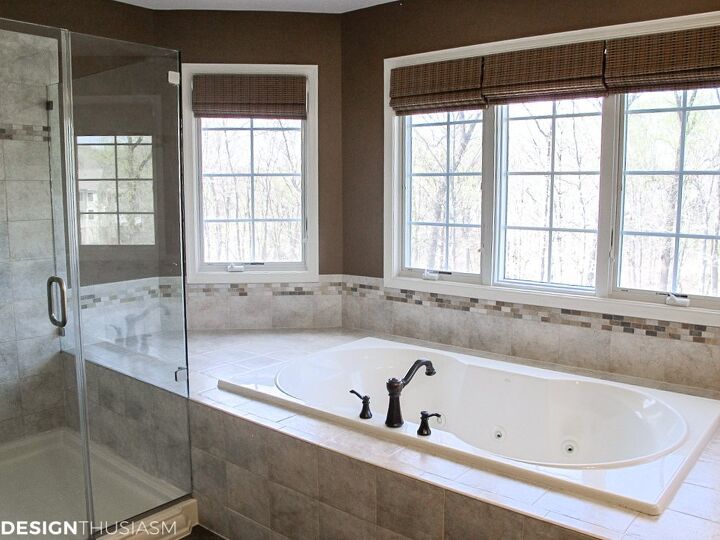
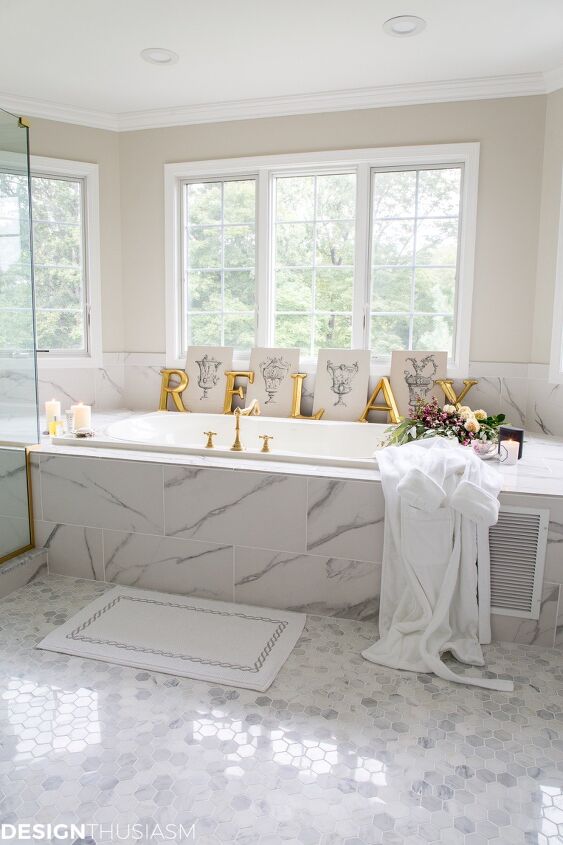
Next up was the tub surround tile. I had decided early on that I would keep the existing tub because this was a place I could reasonably save money. While I really do love free a standing tub, it was not a must-have for me and this was a significant savings to just replace the tile.
I chose marble-look porcelain tile in an oversized rectangle which contrasted nicely against the hexagon polished marble floor. You can read more about the tile in THIS POST.
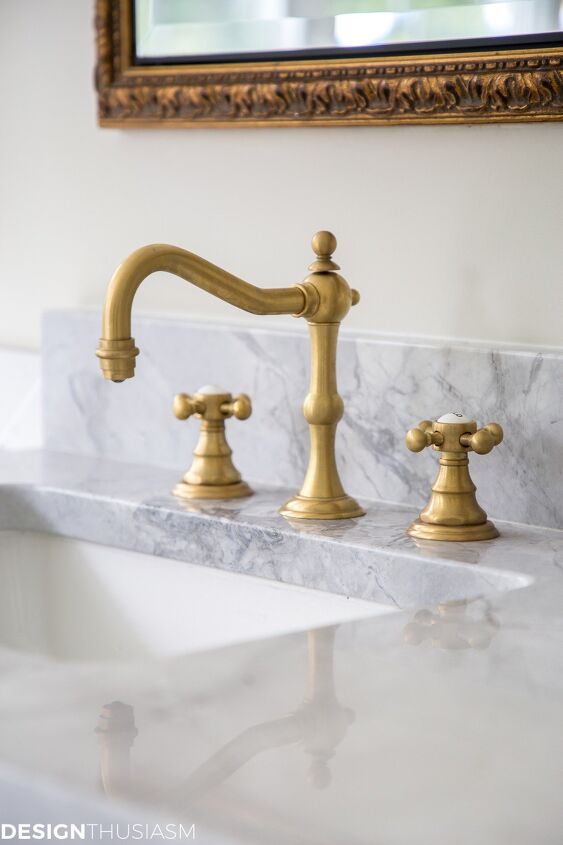
For my countertops I went with a pale grey marble and chose white rectangular sinks. I used antique brass ribbon and reed vanity pulls and carried the same feeling into the towel bars, hooks and paper holder.
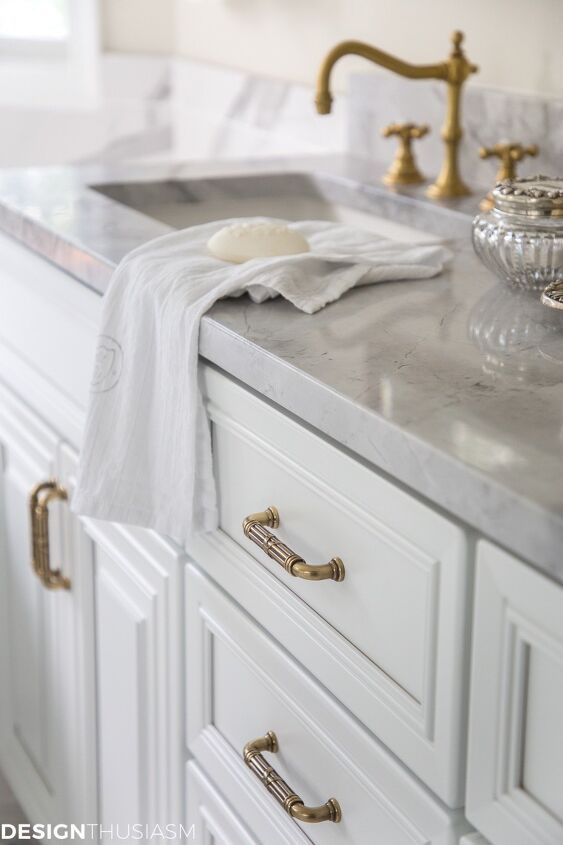
Without a doubt, my favorite detail is the satin gold plumbing fixtures which I had to wait many weeks beyond the quoted date to receive. In the spirit of full disclosure, this is NOT a place where I saved money, although I linked some similar, more affordable styles in the resource section on my blog. For me, the gold hardware playing off the white and grey marble is the quintessential design concept I was going for, so I invested a bit here.
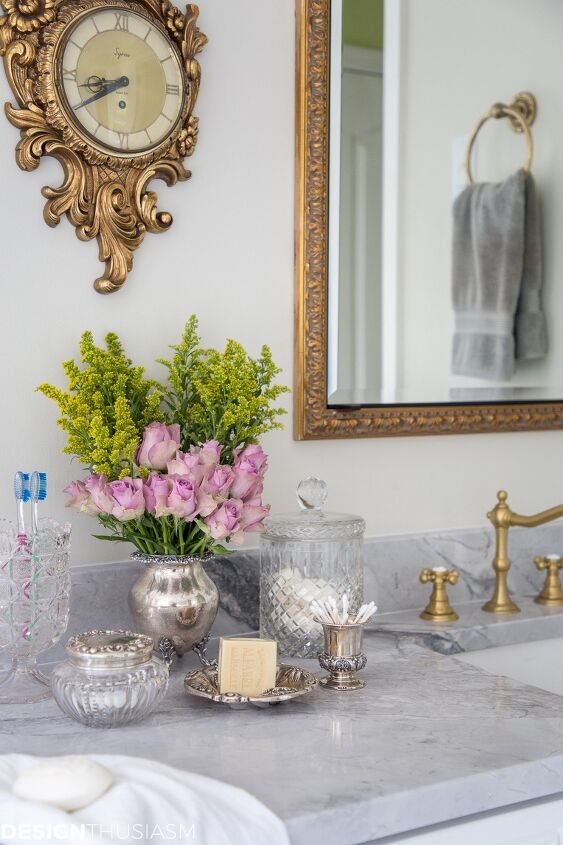
I was so excited to bring out my vintage pieces and see how perfectly they worked with the new space. I enjoy using antique crystal and silver to house the items we use for everyday grooming, from soaps and cotton balls to toothbrushes and q-tips. I also added a vintage clock, found at my parents’ house, which fit right in between the two mirrored cabinets.
I’m also a huge fan of plush white towels, which we use daily for the shower or bath, but I keep a darker grey hand towel on a hook by the sink for face washing and makeup removal.
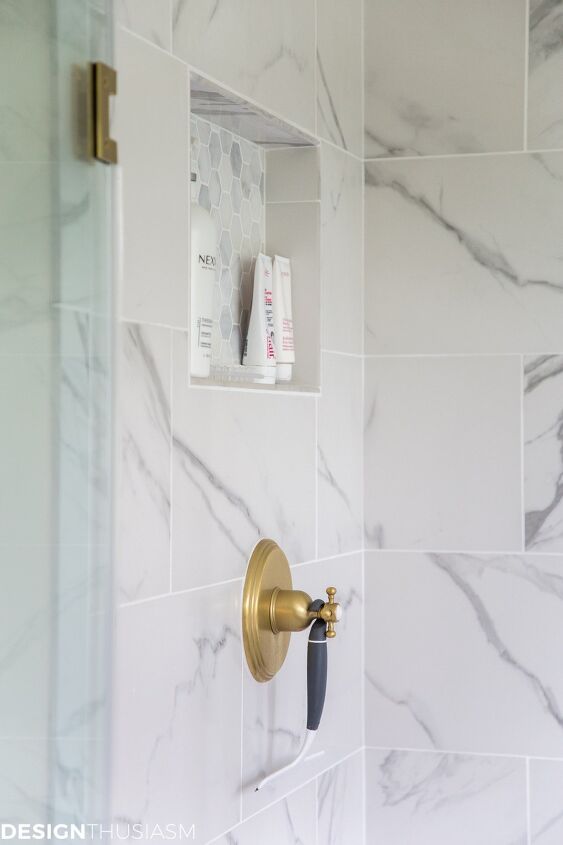
On the opposite side of the room is the stall shower, which initially I thought I would only replace the wall tile. But we decided to re-do the floor and boy is it a good thing, as there was a baseball-sized hole underneath the pan that was the cause of an occasional leak into the kitchen below. (If you’re interested in the construction phase of the remodel, including a peek at that gaping hole, you can see it in the post linked below.)
We were able to save the glass of the main door, but had to re-do the side to line up with the new shower floor.
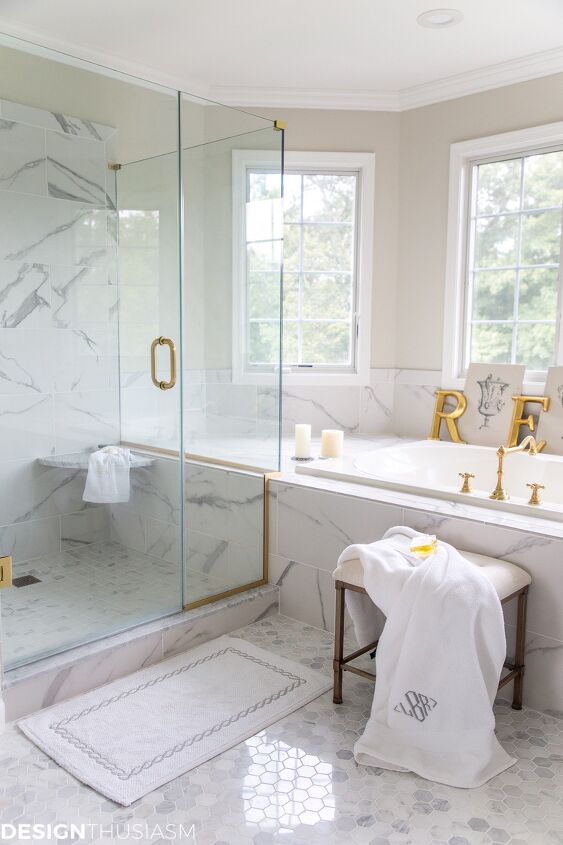
We added a large recessed nook to the shower to accommodate shampoos and other bath products. You can also see my squeegee that I absolutely use every day. It takes 2 seconds and keeps the glass doors looking spotless.
It’s such a pleasure to wake up in the morning and start my day in this light filled bath. The footprint is exactly the same as before but now I am welcomed by all my favorite things!

If you’d like more info on the construction details and resource info, please click on the link below.

Want more details about this and other design ideas? Check out my blog post!


Comments
Join the conversation
Absolutely gorgeous! This is so my style!
Your makeover is beautiful. And this is absolutely no reflection on you. But what on earth were the builders thinking by wasting that much space on each end of the tub? It serves no purpose. That space could've been put to so much better use. And it makes sense that you didn't want to tear it out in order to cut costs but "come on builders, make it make sense!"